
I added the backers of the EEW Nano 2 Kickstarter to this newsletter. If anyone isn’t interested in getting this monthly newsletter just click the unsubscribe link at the bottom of this email and you’ll be removed from this email newsletter forever.
The EEW Nano 2 Kickstarter has finished and was a massive success! There were 3402 backers who pledged over $385K. I love seeing new people get into the craft of spinning and the EEW Nano spinning wheels have enabled many new spinners!
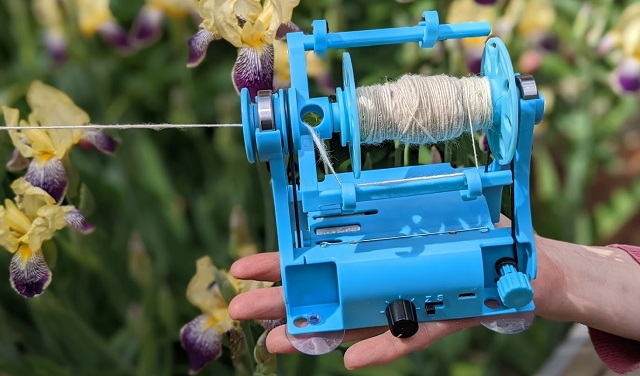
Cone Winder
I’ve started making the plastic molds for the Cone Winder! Many people here are familiar with this project since I’ve done several updates about it in the past, but if you aren’t here’s a Cone Winder prototype video I made a few months ago. I’ve pretty much finalized the design after a lot of adjustments based on feedback from my beta testers. It takes some back and forth to get the molded parts fitting perfectly so getting the molds finished will take some time, but I’m on track to offer a Kickstarter for this project sometime later this year.
When designing the molds one thing I had to do was decide how to balance the upfront cone mold cost versus the end cost to make each cone. A big factor in the cost of each cone is machine time to make them. If I make a mode that makes one cone at a time the mold will be smaller and cheaper to make upfront, but then I can only make one cone every 30 seconds. However, if I pay to have a mold that is twice as big made then I can get 2 cones every 30 seconds. This makes a big difference. For example if I’m making 2,000 cone winders and each has 10 cones that means I need 20,000 cones. These mold machines run 24×7 so this change would basically reduce my machine time in the molding factory from 7 days to 3.5 days which saves a lot of money on machine time. It’s pretty simple math to figure out the best option if I know exactly how many cones I need to make, but I really don’t know that since I want to make the molds before the Kickstater. Even if I waited for the Kickstarter that’s just the demand for the first batch and if people are happy then it will continue to sell well after the Kickstarter when you tell your friends about it. So instead of simple math I end up with too many unknown variables and no known optimal solution. In the end I decided to go in the middle of the options I considered, and do two cones at a time even though I’m guessing 3-4 cones would have probably been better in the long term. This is less risky since it keeps that upfront mold cost in the middle, but I still should be able to sell very high quality plastic cones at a very affordable price.
New Affiliate Program
I created a new affiliate program based on feedback the community provided a few months ago. This program is designed so you can share links or business cards you make and earn 5% of sales (for example 5% of an EEW 6.0 is $14.45). It’s my hope this will help people who run blogs, generate videos, or run in person events to get rewarded for talking about their EEW. I know there are pros and cons to this kind of system, and I put a lot of checks into the system to help reduce abuse. Also if anyone ever sees abuse of this program please let me know, but I’m pretty sure most people who use this system will use it the way it’s intended. If you would like to earn 5% from people who purchase the items on my store when using your link then you should try out my new affiliate program. If you’re interested this page has more information about this program.
Free 3D Printable Parts
I offer free access to various 3D files like bobbins for my different eSpinners and a bunch of other accessories. In the past I’ve used Thingiverse to manage these files and still like them. However, I’ve started using a new system called Printables because their interface seems better. If you have access to a 3D printer go check out all my 3D files on Printable here and leave me a review there. If you don’t have a 3D printer, I don’t sell these parts myself, but I let other businesses sell these files and have a list of various options here.
Product Updates
Below are just estimates and the dates may change.
- EEW Nano 2 – Shipping in October
- EEW Cone Winder – Kickstarter in 4th Quarter
Love your fiber and it will love you.
– Maurice Ribble
(Inventor of the Electric Eel Wheel)
View web version of this email
www.dreamingrobots.com
EEW Facebook Group
EEW Ravelry Group
EEW Youtube Channel
EEW Instagram Account
EEW Discord Server